
As a photographer, you must have come across the term ISO or ISO speed. It’s commonly attributed to the International Organization for Standardization, which works to create standards for many products and services. However, when the term is used in relation to digital photography, it refers to the sensor’s sensitivity to light. Depending on the higher or lower sensitivity setting of ISO, an image can be over or underexposed. The key to using the right ISO number is understanding how it reacts with the other parameters of exposure – Aperture and Shutter Speed- and keeping that in mind when dialing in the exposure settings.
In this discussion, we will learn about the proper use of ISO, how to circumvent the limitations, and the best use case. We’ll also discuss a few scenarios and how to tackle them to make better photos. Definition.
The definition of ISO, as I have explained above, denotes more than just the sensitivity of a sensor. It refers to the International Organization for Standardization. However, in photography, ISO relates only to the light sensitivity of the digital sensor.
ISO has often been considered a parameter that affects the light-gathering ability of a sensor. ISO doesn’t do that. ISO doesn’t govern how much light is captured by a sensor. It’s the job of the other two parameters of exposure – Aperture and Shutter Speed- to determine how much light the camera captures. ISO is about how sensitive a sensor is to light. In other words, ISO relates to what happens after the light reaches the photographic sensor.
ISO Explained: Understanding Sensitivity
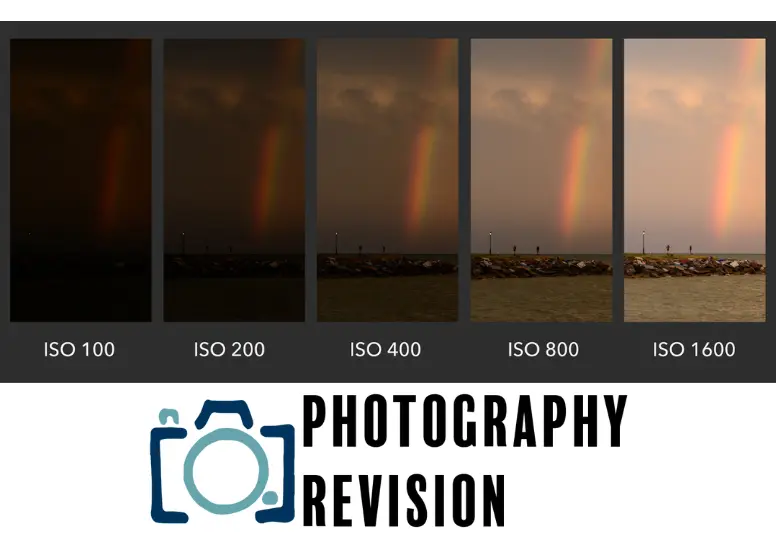
ISO sensitivity is measured in numerical values, commonly ranging from ISO 100 to ISO 6400 or higher. The lower the ISO value, the less sensitive the sensor is to light, resulting in a darker image. Conversely, higher ISO values increase the sensor’s sensitivity, resulting in brighter images.
What is ISO?
Let’s get a better understanding of ISO before we begin. In this camera setting, the user can adjust the brightness or darkness of the picture. Although there is no direct connection between it and the International Organization for Standardization, users often mistakenly associate it with it. Film manufacturers first used the term, but digital cameras now use it.
Simply put, ISO refers to how sensitive your camera sensor is to available light. A low ISO number indicates a camera sensor that is less sensitive to light, whereas a high ISO number indicates a sensor that is highly sensitive to light. As such, ISO measures “sensitivity” when asked, “What does ISO measure?”.
As there are many different types of digital sensors available on the market, the sensitivity can vary. Although DSLR cameras have relatively simple sensors, the same settings generally apply.
An image is created by light being processed by a camera’s sensors, which are the most expensive and important parts. When you set your ISO to a higher number, you can capture images in low-light environments. If you zoom in or print a large version of your pictures, higher ISO levels can cause grain and noise to enter the picture.
You may enjoy reading Best Cameras for Sports Photography
That begs an explanation of the question, “What is exposure in photography?”
Adobe defines exposure as the amount of light that reaches your camera’s sensor.
It’s to be noted here that all digital cameras have a single sensor sensitivity. They have been tuned to deal with the incoming light in one way. So, what happens when you tweak the ISO number? You change the Gain. Some modern digital cameras have dual ISO settings and are designed fundamentally differently to handle light in different lighting conditions. More on that later.
Before the term ISO became commonplace in photography, two other terms were used in the days of film cameras. These were ASA and DIN. These two terms were later combined to form ISO in 1974. If you check old photographs showing packs of a film roll, you will find the letters ASA on them. ASA is to film what ISO is to digital sensors. Measurement
ISO is always represented by a whole number starting with 100. However, ISO 64 (lowest ISO setting) is also standard in some high-end cameras. Each time the ISO number doubles or halves, the sensor’s sensitivity to light doubles or halves with it. What is the effect of that?
When light sensitivity doubles, the camera can make do with half the amount of light and produce a much more effortlessly well-exposed photo. Conversely, when light sensitivity halves, the camera needs double the amount of light to make the same exposure.
Let’s take an example to understand this.
Let’s say that you’re shooting in a low-light situation. At ISO 100 and aperture f/4, your camera meters a scene at 1/100 sec. If you bump the ISO to 200, leaving all other settings the same, the camera will now meter the scene at 1/200 sec. This is considering that the ambient light does not change in between.
On the other hand, let’s say you’re shooting in a broad daylight scene, and your camera meters at 1/1000 sec at f/2.8 and ISO 200. If you reduce the ISO number to 100, the camera will now meter the scene at 1/500 sec. Considering again that you don’t tinker with any other settings and the ambient light does not change in between. When do you need to tinker with the ISO settings?
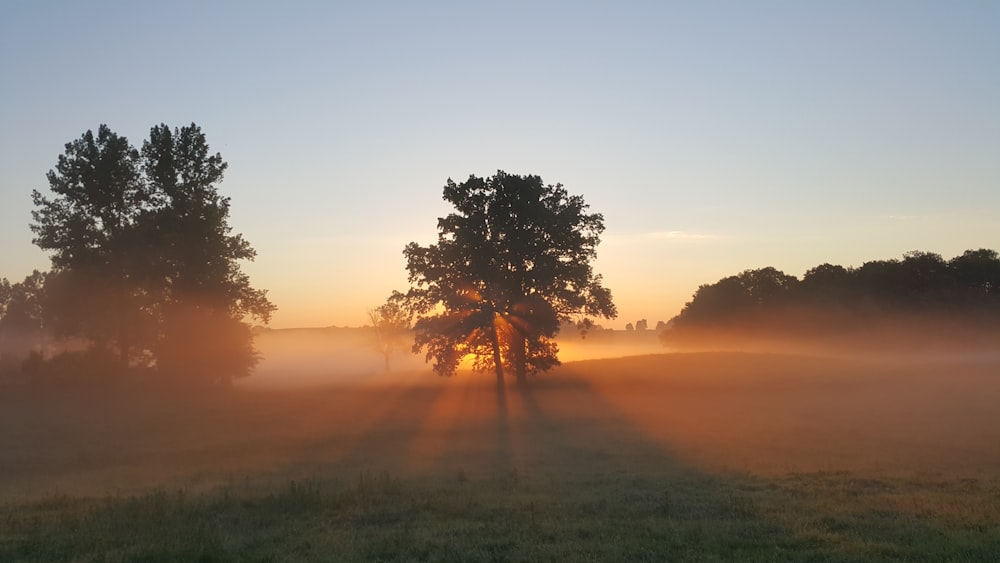
Let’s say you’re shooting bird photography. You’re set up to track this, Osprey. You know that the bird will make its move soon, and you’ve set a fast shutter speed of 1/2000 sec to capture the moment when the bird swoops in for the kill. The aperture is around f/5.6 to allow you a decent depth of field without compromising the shutter speed. However, you notice that the ambient light is suddenly dropping. It could be because of approaching dusk or cloud cover. In a situation like this, you have no leverage to change things unless you tinker with the ISO. You need to use higher ISO settings to get a sharp image. Without a higher ISO number, you risk motion blur in your image. Relationship with other exposure parameters
As we have learned above, ISO isn’t an exposure parameter. This is a common misconception. Many beginner photographers read that ISO, shutter speed, and aperture are the three pillars of photographic exposure and that they’re the holy trinity of photographic exposure and stuff like that. That leads to a belief that ISO determines how much light the camera captures. This isn’t the case. ISO does not specify how much light the camera captures. The job of ISO is to amplify the light according to the Gain applied using the ISO settings via the camera menu.
Despite all that, ISO does have a bearing on how the other two parameters – Aperture and Shutter Speed will react when the ISO value is tinkered with. Let’s look at that.
Your sensor sensitivity increases when you push the ISO by one stop, say 100 to 200. Instead, the gain doubles. That means the camera can make do with half the light it usually needs to produce a good exposure.
Let’s say that you’re shooting in low-light conditions. Perhaps an indoor setting with a single small window in the room. The ISO settings on your camera are 100. Let’s also assume that you’re shooting at the widest aperture your lens supports which is f/2.8. In that setting, the exposure meter says it would take 1/100 sec to properly expose.
One way to counter the problem could be to use a tripod and a slower shutter speed. That would allow light to enter over some time. That will ensure that your camera can record good exposure. The other option is to increase the ISO number. Pushing the ISO from 100 to 200 will shoot the shutter speed to 1/200 sec. Sufficient for good hand-held exposures.
That means increasing the ISO number has a reciprocal effect on shutter speed. It works very similarly with the aperture value as well.
This is why it’s pertinent to note that when you increase or decrease the ISO value by one stop, you should make a reciprocal change in any one or both of the other two parameters that’s the equivalent of the number of stops of difference you make in the ISO value.
In the above example, if you had changed the ISO from 100 to 400 (made a change of two stops), you could have made a change of one stop in the shutter speed (speed up shutter speed by one stop) and also a change of one stop in the aperture value (open up aperture by one stop). In this hypothetical case, however, with a maximum aperture of f/2.8, there was no option to do so. But with a lens with a wider aperture, you could have done that. ISO and gain

ISO does not determine how much light the camera collects. So, it’s not a part of the exposure triangle. However, increasing or decreasing ISO results in an image getting over or underexposed. So how does that work? How does ISO do that?To understand this, we need to understand how ISO reacts with light.
When you change the ISO number from the menu or use a dedicated dial on your camera, what you’re doing is you’re simply changing the Gain of your camera. As we know, when you change the Gain of any signal, you’re boosting it. The more you boost the signal, the higher is going to be the exposure. Of course, there are downsides to that.
The higher you boost a signal, the more the noise levels will be. In this case, I am referring to digital noise. You can see that when you inspect your images closely, especially in the shadow areas. They will appear as tiny specs and cover the whole of the image.Also, with increasing ISO, the dynamic range of your images is going to be affected. The higher the ISO lower is going to be the dynamic range. Dynamic range is the best when the camera shoots at its base ISO. A word on ISO number and dB number
You will notice that many video cameras don’t have term ISO. Instead, the camera’s sensitivity is referred to using the term Decibels or dB. Now Decibels or dB is a more accurate representation of what happens when you increase the Gain of your images. ISO isn’t an accurate representation because ISO does not give you a lot of information as to what’s happening behind the scenes.
For example, in a film camera, a decibel or dB value of 0 means no signal boost is applied. When you push the dB value to 6, you’ve effectively doubled the signal boost. That can be considered to be roughly doubling the ISO value. Filmmakers will identify more with the dB value than the ISO value as they’re used to it. Unfortunately, with digital still cameras, the ISO number is the dominant value, and despite it not giving an accurate indication of how much Gain is being applied, it has continued to remain the only way to express sensor sensitivity. Low light photography and ISO settings
The rule of thumb when shooting low-light photography is to start with a low ISO value so that you don’t add any more noise than you’ve to when negotiating those low-light situations. As we have learned above, using a higher ISO number is the same as pushing the Gain of your images. When you do that, you also push the noise and reduce the dynamic range of your pictures.
There is a relationship between pixel size and the light-capturing capacity of those pixels. With it, there is also a relationship between pixel size and noise. The bigger the pixel size, the more the light-gathering capability of that pixel, and with it, the chances that it will have less noise. Full-frame cameras have a larger sensor size and are generally better in darker environments than APS-C and compact cameras. What is Auto ISO, and how and when to use it?
Auto ISO is a term you will hear about as you make some inroads into the world of low-light photography and tinker with your ISO settings more and more. Auto ISO is a feature that most mid-range and high-end digital cameras come with. This feature allows the camera to automatically dial the correct ISO number based on the exposure settings you’ve dialed in and the available light.
Sometimes it becomes imperative to change the ISO value only and leave the aperture and shutter speed as they’re, such as when you need to have a desired depth of field, and you don’t want to change the shutter speed either.
ISO Settings and Their Impact
Adjusting the ISO settings on a camera enables photographers to adapt to different lighting conditions. When shooting in low-light environments, increasing the ISO can compensate for the lack of available light, allowing the camera to capture a properly exposed image. However, increasing the ISO also introduces digital noise or graininess to the photograph, which may degrade image quality.
Controlling Noise with ISO
Digital noise refers to the unwanted grain-like artifacts that appear in photographs, especially when using high ISO settings. Higher ISO values amplify the electrical signals from the image sensor, leading to an increase in noise. To mitigate noise, photographers strive to use the lowest possible ISO setting that still achieves the desired exposure.
Choosing the Right ISO for Different Lighting Conditions
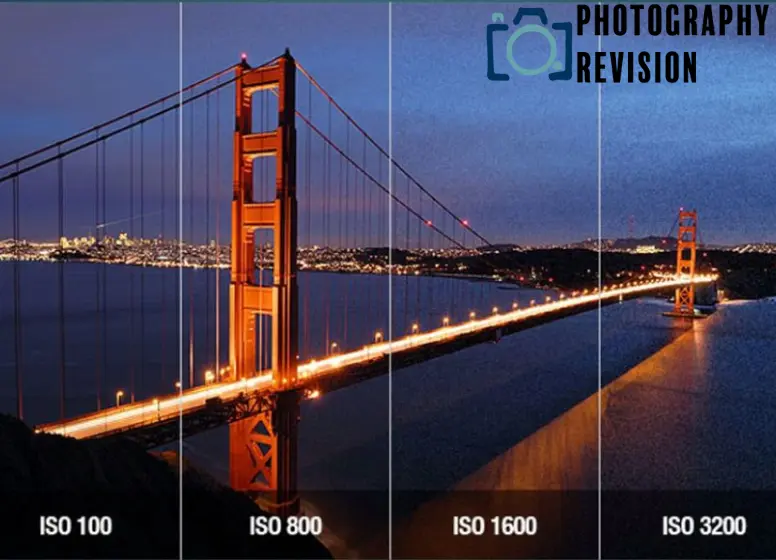
Selecting the appropriate ISO setting depends on the available light and the desired outcome. In well-lit environments, using a lower ISO value, such as ISO 100 or 200, is ideal as it produces cleaner and less noisy images. In situations where light is limited, a higher ISO, such as ISO 800 or above, may be necessary to maintain proper exposure.
ISO and the Exposure Triangle
ISO is one of the three pillars of the exposure triangle, along with aperture and shutter speed. These three elements work together to achieve a balanced exposure. Increasing the ISO allows for faster shutter speeds or smaller apertures, providing more flexibility in capturing various subjects and scenes.
ISO Tips and Techniques
- Experiment with different ISO settings to understand their impact on image quality.
- Use lower ISO values whenever possible to minimize noise.
- Increase the ISO gradually in low-light situations to maintain a balance between exposure and noise.
- Combine ISO adjustments with appropriate aperture and shutter speed settings to achieve the desired creative effect.
You may enjoy reading Best Canon Lenses for Landscape Photography
ISO in Different Photography Genres
Different photography genres may require specific ISO settings to achieve optimal results. For example:
- Landscape photography often benefits from lower ISO values to capture fine details and maintain image sharpness.
- Sports and action photography may require higher ISO settings to freeze fast-moving subjects in low-light conditions.
- Portrait photography often utilizes moderate ISO values to strike a balance between capturing facial details and minimizing noise.
ISO and Post-Processing
During post-processing, adjusting the ISO value in software does not alter the actual sensitivity of the camera sensor. Instead, it affects the brightness of the image by amplifying or reducing the existing data. It is generally recommended to achieve the desired exposure in-camera rather than relying heavily on post-processing adjustments.
Common ISO Myths Debunked
- Myth: Higher ISO always results in better image quality.
- Myth: The camera’s maximum ISO setting should always be used in low-light situations.
- Myth: Lower ISO values are only suitable for bright environments.
- Myth: Post-processing can completely remove noise caused by high ISO settings.
The Evolution of ISO in Digital Cameras
As digital camera technology has advanced, so has ISO performance. Modern cameras offer higher ISO ranges with improved noise reduction algorithms, allowing photographers to capture high-quality images even in challenging lighting conditions. Continuous advancements in ISO capabilities have expanded the creative possibilities for photographers.
ISO in Smartphone Photography
Smartphone cameras have also embraced the concept of ISO. While their sensor sizes are smaller compared to dedicated cameras, smartphones utilize advanced computational algorithms to optimize ISO settings and reduce noise. Some smartphones even offer manual ISO control, enabling users to fine-tune their photography settings.
ISO and Low-Light Photography
Low-light photography presents unique challenges that can be overcome with the appropriate ISO settings. By increasing the ISO, photographers can capture well-exposed images in dimly lit environments without the need for additional lighting equipment. However, it is essential to strike a balance between ISO and noise to maintain image quality.
You may enjoy reading Beginner Tips for Macro Photography
ISO and High-Speed Photography
High-speed photography often requires fast shutter speeds to freeze motion effectively. In situations where there is limited available light, increasing the ISO can help achieve the necessary exposure for capturing fast-moving subjects with minimal motion blur.
Let’s take an example to understand this ISO.
Let’s say you’re shooting portraits in low light conditions using ambient light. You have set the fastest aperture the lens can open up to and use a shutter speed that’s just more than the focal length (say 1/100 sec). Let’s say that the ambient light drops further. If you set your camera to Auto ISO and designate a minimum shutter speed, the camera will automatically increase the ISO when that designated shutter speed is reached.
The benefit of this is immense. You can use Auto ISO to supplement your exposure settings when shooting in a dynamic and fast-paced environment – such as shooting events, wildlife photography, and sports where a faster shutter speed is necessary. You can also use Auto ISO to take care of scenes without time to tinker with your camera settings. Conclusion
ISO is an integral part of the whole process of image-making. You need it to balance exposure in various lighting conditions, not just dark indoor lighting. You need it for working in high-speed or fast-action photography. You need it when shooting wildlife and sports photography, just as well as for shooting commercial photography. It is useful for avoiding camera shake in some situations and for better results. However, it has its pros and cons.
As a photographer, you must take the judgment call as to how to use it and the right amount to make it work for you in a decisive way. Knowing when to avoid high ISO values and using a longer shutter speed ensures less noise.
FAQs
Is a higher ISO always better for low-light photography?
While a higher ISO can compensate for low-light conditions, it also introduces more digital noise. It’s essential to find the right balance between ISO and noise for optimal image quality.
Does increasing the ISO affect image sharpness?
Increasing the ISO itself does not directly affect image sharpness. However, higher ISO values may amplify noise, which can give the impression of reduced sharpness.
Can I fix noisy images in post-processing?
While noise reduction tools in post-processing software can help minimize noise, it’s generally better to capture a well-exposed image with the appropriate ISO settings in-camera.
Do all cameras have the same ISO range?
No, different cameras have varying ISO ranges. Higher-end cameras typically offer wider ISO ranges and better noise performance compared to entry-level or older models.
What is the native ISO of a camera?
The native ISO refers to the camera’s base ISO value at which it achieves its optimal performance in terms of dynamic range and noise performance.
Conclusion
ISO plays a vital role in photography, allowing photographers to adjust the sensitivity of their camera’s image sensor to light. By understanding how ISO works and its impact on image quality, photographers can make informed decisions when capturing photographs in various lighting conditions. Balancing ISO with aperture and shutter speed settings ensures optimal exposure and creative control.
Take our photography quiz if you interested in reviewing which camera is best suited to you.
Comments are closed.