
Use a tripod
This is the first suggestion I will give you as someone starting in macro photography. Macro photography is all about detail and sharpness, and if you are going to handhold your camera, chances are that you will induce image blur in your shots.
I recommend investing in a decent tripod if you are just beginning in macro photography. There are hundreds of models available, costing less than 100 bucks.
Travel tripods are smaller in size, and they cost a lot less than full-sized tripods. They are a good place to start your search.
Smaller tripods are more versatile because you can take them with you on your travels, and they become perfect tripods. The only drawback with smaller tripods is that they may be unable to support heavier cameras and lenses.
Get close
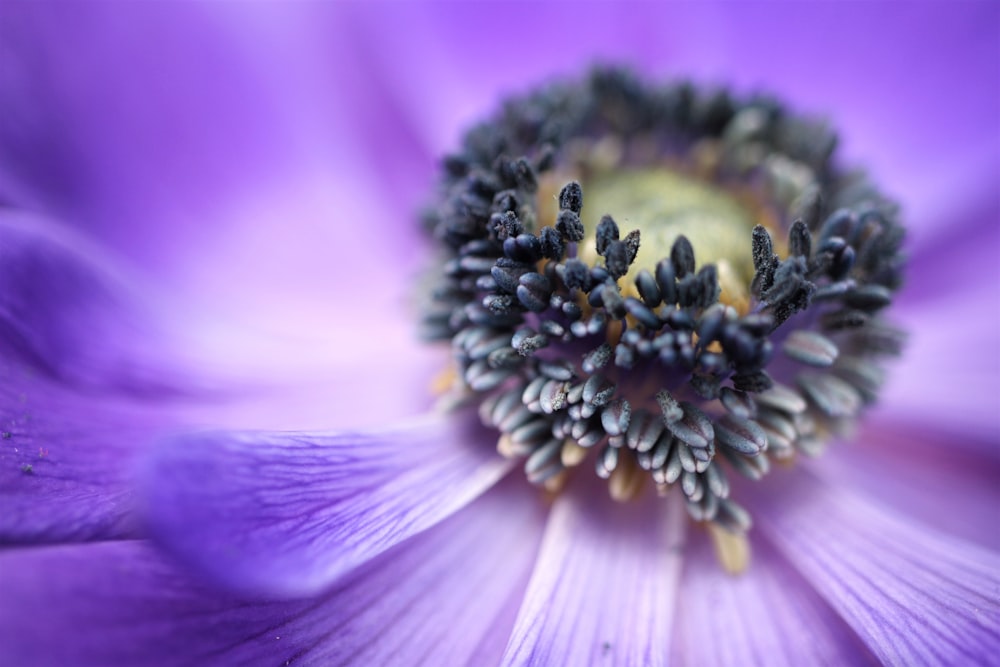
The basic idea behind macro photography is to be able to get close so that you can get a larger magnification of a subject. Standard lenses (non-macro) can’t focus close, so they cannot produce a 1:1 magnification of a subject. Macro lenses, on the other hand, can focus extremely close, and they’re also capable of producing 1:1 magnification.
This is why a macro lens can capture an image of a small bug the same size (life size) on the image sensor. On the other hand, a normal lens will only capture a very small representation of the subject on the image sensor.
Of course, everything hinges on you using a dedicated macro lens. You can also shoot macro photos using the reverse lens technique, but the results are never similar.
Get a dedicated macro lens

There are many different tools to shoot macro photography, but a dedicated macro lens is the best. Unlike the other contraptions, including macro filters and the reverse lens technique, which severely limits a photographer’s creative abilities, a dedicated macro lens is much more convenient.
Because a dedicated macro lens does not use any filters or does not reverse the optical architecture of a lens to focus closely, it performs as it’s designed. Thus a dedicated macro lens can produce sharper images with fewer aberrations and capture a higher amount of contrast. Even if you get a budget macro lens, you will never complain about the optical sharpness of the lens.
Additionally, with a dedicated macro lens, you’re in complete control of the depth of field. True, when shooting at 1:1 magnification, you don’t get to use a wide-open aperture, but you can still choose the aperture you want to use.
Also, a dedicated macro lens allows you a lot of creative flexibility, which other makeshift techniques and tools do not. For example, a dedicated macro lens can also shoot excellent portrait photos. Take, for example, the 105mm f/2.8G IF-ED. This is a true macro lens (one that offers 1:1 magnification). But at the same time, you can use this lens for shooting portrait images. Thanks to the f/2.8 wide open aperture that kicks in when you’re not close focusing with this lens.
Use manual focusing mode

For the best results, rely on manual focusing. Manual focusing entails using the manual focusing ring on a lens and switching off the autofocusing mode on the lens and the camera. This will take a while to get used to, at least for someone who has just started and has used autofocusing all their life.
I am sure many of you will start with autofocusing as your preferred method. But sooner than later, you will understand that autofocusing isn’t giving reliable results at all times, especially when trying to focus on a bit of detail that’s not contrasting. The AF on your camera will struggle and force you to interfere by manually taking over the focusing mode mechanism.
Manual focusing is more precise, and it lets you lock focus on anything in the frame, never mind how much contrast that point has. Autofocus can struggle when there is a lack of contrast or when there isn’t much light to utilize. This, however, depends on the fact that you’re working at least the minimum focusing distance required by the lens to focus on. When shooting macro photos, if I realize I cannot focus, I take a step back, which usually corrects the problem.
Use a small aperture

A small aperture allows you to capture a larger depth of field. With macro photography, as the distance between the camera and the subject is very small, the depth of focus is thin. It’s easy to have most of your subject out of focus if that subject is very small (a bug or a coin, or a button).
The smaller the subject, the smaller should be the corresponding aperture to ensure that you’ve enough depth of field to have most of the subject in focus. For anything smaller than half of your little finger, use an aperture of f/8. For anything bigger than that, you can suitably use a larger aperture.
Try the focusing stacking technique
This is advisable for stationary subjects. I wouldn’t recommend this technique for subjects that are moving about – butterflies, spiders, caterpillars, and even flowers in an outdoor situation.
If you want to use this technique on flowers, then setup inside a studio where the wind does not play spoilsport.
The focus stacking process involves using at least two or more images in which the focusing point is placed at different distances in the frame. So, if one image has the focus set on the front one-third of the subject, one could have the focus point on the rear one-third, and the final image could have the focus point on the middle of the subject.
You need two to three images, but this isn’t mandatory. You can easily choose more than three depending on the subject you photograph.
One of the best focus stacking tools that I have used in recent years is Luminar Neo’s Focus Stacking Extension. This tool is only available as a part of the Pro Plan or the Lifetime plans they offer. You won’t be able to use this as a part of the Photoshop or Lightroom Plugin versions.
This tool allows you to stack up to 100 images, and the powerful AI tool usually gets it accurate.
You can also try using Lightroom and Photoshop. Having done the basic edits in Lightroom, you can open the images in Photoshop as layers and use Auto Align and Auto Blend to align the images and then stack them up together. With Luminar Neo’s Focus Stacking Extension, though, you’ve to hit only one button, and the tool automatically takes care of the alignment and blending.
Experiment with a remote shutter release
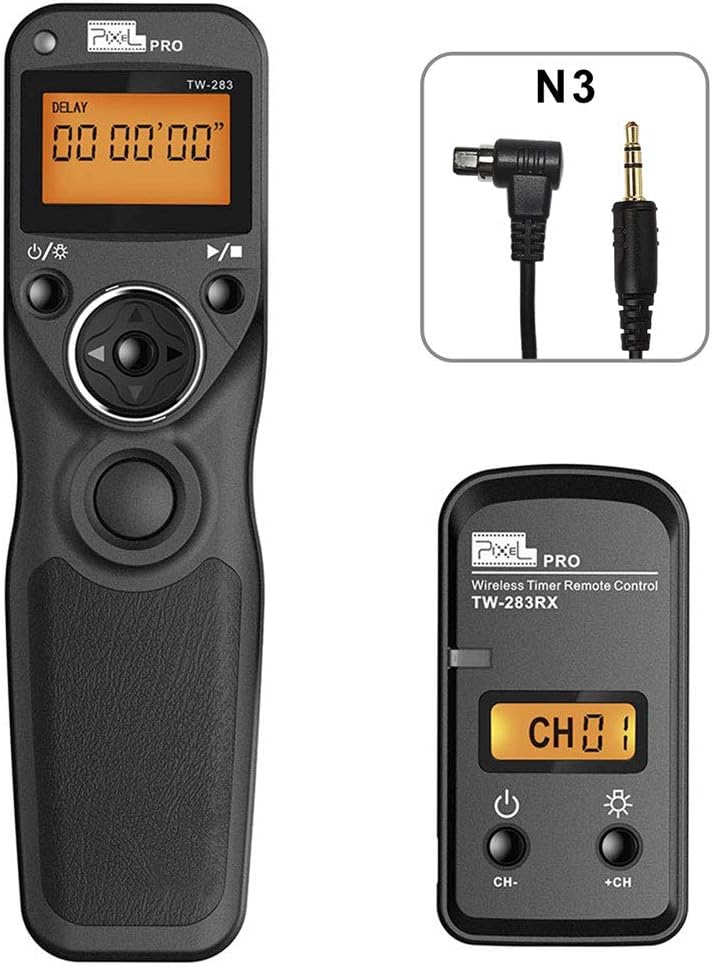
A remote shutter release is probably one of the most underrated tools in photography. A remote shutter release plugs into your camera and works as a trigger for your shutter release button. Some remote shutter releases work via wireless technology.
The plugged-in version is sometimes also referred to as cable release. Both have their advantages and disadvantages and perhaps in a separate article, I will discuss each type of remote release and their best use cases.
To shoot macro photography, you can choose any of these remote shutter release options.
A remote shutter release eliminates the need to touch the physical shutter release button by the photographer. Doing so eliminates any chances of physically rocking the camera at the time of exposure.
Macrophotography requires utmost precision, and even the slightest movement of the camera can be magnified in the final image.
Use the delayed shutter technique if you do not have a remote shutter release. This significantly quietens down the springing movement of the reflex mirror and therefore cuts down on any vibration.
In any case, you require a tripod to set up your camera and lens. Shooting macro photos handheld is always a difficult proposition. I am not suggesting that it is impossible to shoot macro photos handheld, but I merely suggest that you use a tripod setup to get sharper and better photos.
Experiment with artificial lights
Natural light is great for shooting high-quality macro photos. But once in a while, you need to get additional help in the form of artificial lighting systems. The greatest benefit of artificial lighting systems is that they are constant. Unlike natural lighting, which changes color over a period of time, artificial light does not change color.
That means you get consistent lighting throughout the shoot, no matter how long it’s. You don’t require too many fancy lights in order to shoot macro photography. Just a couple of speedlights will do.


There are specially designed macro flashes there are perfectly suitable for shooting macro photos. You can buy one of these and experiment with it. Macro flashes are not that expensive to buy. But the best part is the way they are designed. They can concentrate the lighting onto a small subject from at least two sides for optimum results.
While you are using artificial lights, also bring in to play a few reflectors to ensure that you have enough light fill options to work with sometimes, though, using a reflector may not be feasible because of the nature of the subject that you’re photographing. Macro flashes are your best bet in such situations.
Start with these camera settings
As you progress as a macro photographer, you will no doubt experiment with the different camera settings. However, it is imperative that you start on the right footing. What it entails is that you need to have the basic camera settings correct right at the start. You can always experiment with them later on.
So what camera settings are necessary to shoot great macro photos? I have already clarified the basic aperture settings in the previous paragraphs. Just to reiterate, you need to shoot with a smaller aperture to ensure that your depth of field is large.
Coming down to the shutter speed, you need a fast shutter speed in order to freeze the movement. If it is a small bug, a butterfly you are trying to photograph, it is a fidgety customer. It won’t give you a lot of time to compose and get your exposure details right. You’ve got to be ready to capture the moment in a flash.
So, set your camera to shutter priority, push the ISO to a number that allows you to get a fast capture even with a relatively smaller aperture like f/5.6, and then fire away. Of course, in this equation, any external lights will surely help. With external lights, you don’t have to push the ISO too high; you also get to shoot a clear exposure of a subject in its natural habitat.
However, with flash, you will be limited to the camera’s maximum sync speed limitation. On most DSLRs, that would be 1/250 unless you’re using High-Speed Sync (HSS). Mirrorless cameras allow you a slightly faster sync speed. Check your camera menu to confirm the highest flash sync speed possible.
Learn how to post-process your images
Post-processing is integral to any photography, and macro photography is no exception. No matter how much time you spend getting your images right in the camera, you must spend some time refining your images. The amount of time you spend refining your images will depend on how much of the image you’ve got right in the camera.
Even after using the best camera, lens, and shooting techniques, you may find that your images lack contrast, brightness, sharpness, and saturation. These are elements that separate an average image from an image that stands out.
In order to achieve the desired results, you need to invest some time in post-processing. You can try out many avenues to get the desired knowledge. Joining a dedicated course in post-processing is one of those. There are free tutorials on YouTube that you can watch that shares a wealth of information on post-processing.
This is an ongoing process, and you need to keep refining and keep experimenting with it.