
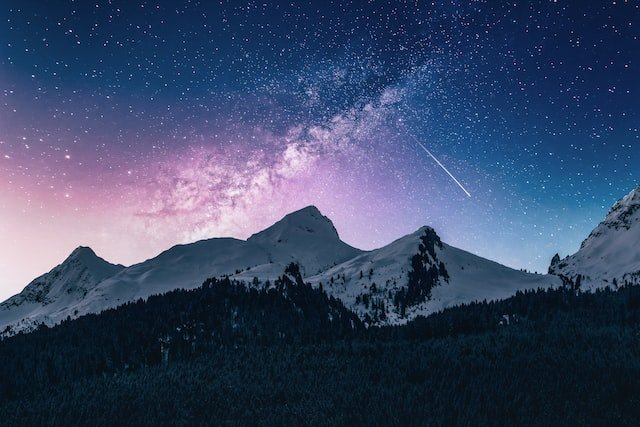
Astrophotography is a very demanding genre of photography. It involves capturing photos of deep sky objects like the Orion Nebula and other deep space objects like star clusters, constellations, etc. It also involves capturing objects which are closer like planets in our solar system and photos of our moon. There are many different techniques and tools used in astrophotography, making this one of the most demanding genres of photography out there.
This happens to be one of the most gear-hungry photography genres out there. In this brief discussion on Astrophotography on a Budget, we will understand the basics of the genre, how to get started, and if budget astrophotography is possible.
Many beginner photographers don’t have a deep pocket to purchase advanced equipment. Even though astrophotography is an expensive hobby, people are very interested in shooting in this genre. We will try and find tools that they can use to make astrophotography on a budget. One thing is important, we will refrain from looking at equipment that is for professional photographers with a huge budget. This guide is for beginners. No beginner astrophotographer can hope to make a huge investment in tools early in their career. So we have decided to refrain from suggesting tools that are too expensive. Even the cameras we have suggested can be bought second-hand and can be obtained at a reduced price in pre-owned stores if cost is a factor. So, you don’t have to spend much money on them.
Let’s get started.
Understanding Astrophotography
Astrophotography is the art of capturing images of celestial objects using a camera and telescope. It requires a combination of photography skills and knowledge of astronomical objects. With astrophotography, you can reveal the hidden wonders of the universe and create awe-inspiring images that showcase the beauty of the cosmos.
You may enjoy reading Guide to Architectural Photography
Essential Equipment for Astrophotography
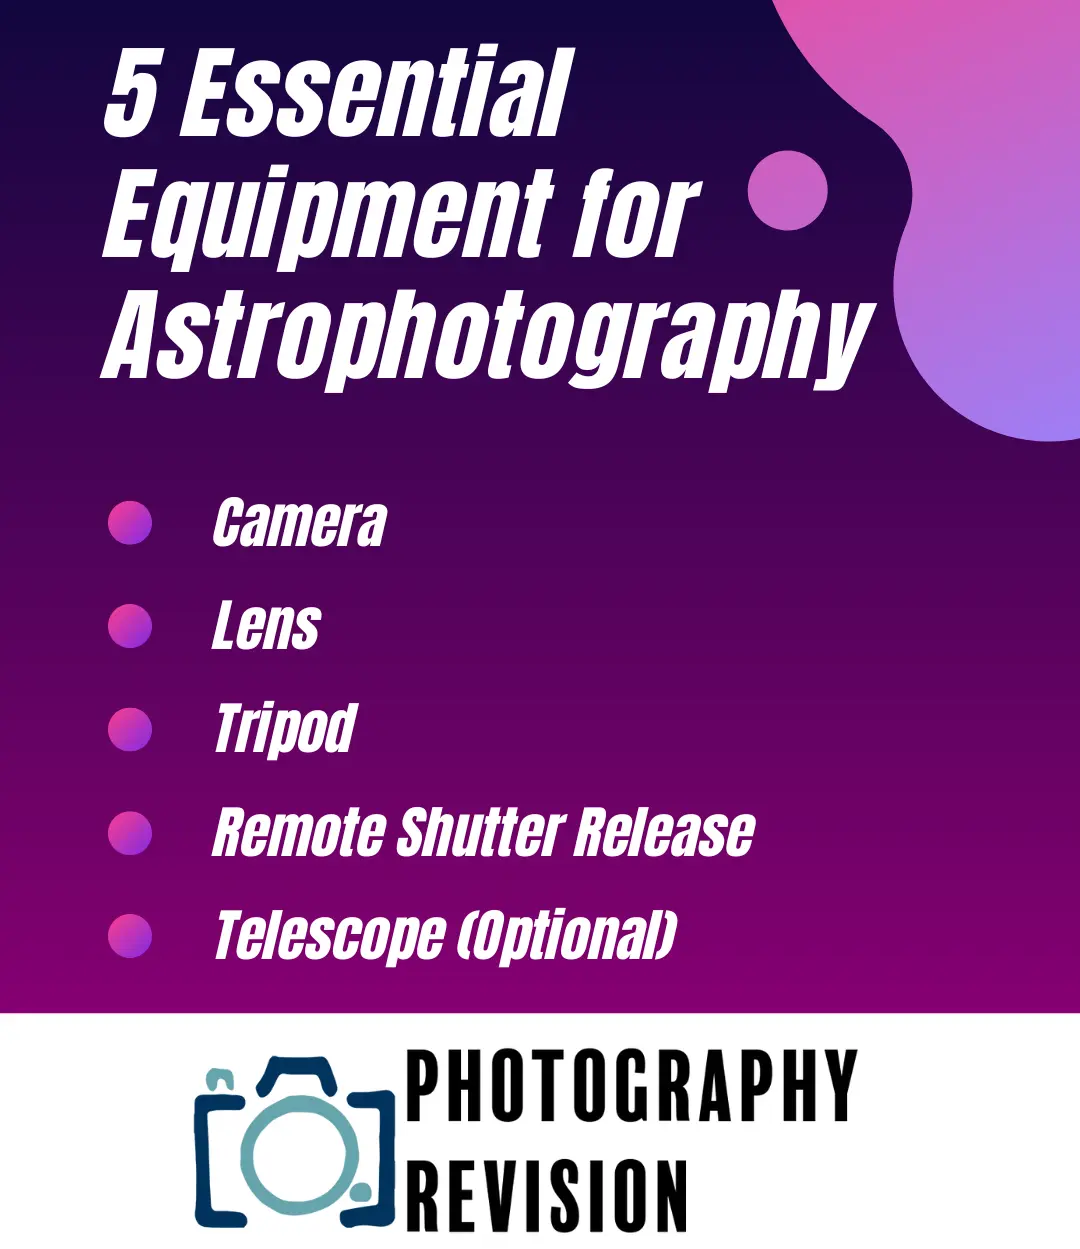
To embark on your astrophotography journey, you’ll need some essential equipment. Here are the key items you should consider:
1. Camera
A DSLR or mirrorless camera with manual controls is a great choice for astrophotography. Look for a camera with good low-light performance and the ability to change lenses.
2. Lens
Invest in a wide-angle lens with a low aperture (f/2.8 or lower) to capture more of the night sky and allow more light into the camera.
3. Tripod
A sturdy tripod is essential to keep your camera stable during long exposure shots. Look for one that can support the weight of your camera and lens.
4. Remote Shutter Release
A remote shutter release or intervalometer allows you to trigger the camera without touching it, minimizing the risk of camera shake.
5. Telescope (Optional)
If you want to capture detailed images of celestial objects like planets and galaxies, consider investing in a telescope with astrophotography capabilities.
The choice of optic depends on the kind of astrophotography you plan on doing. Different astrophotography subjects require different lenses and setups. So, when you start, you should choose what kind of astrophotography you plan on doing and then build your setup around that target subject.
If you are interested in capturing the Milky Way and the vast expanse of the night sky, the best lens is a wide-angle lens with a fast wide aperture. Fast lenses capture much light in these conditions. A good choice is the Sigma 20mm f/1.4 DG HSM Art or the Samyang 14mm f/2.8 ED AS IF UMC.
These camera lenses capture a vast expanse of the night sky thanks to the wide focal length and fast wide aperture that ensures a lot of light is captured quickly. A shorter exposure time is better for capturing sharper photos. We will come to that later. You can opt for the manual focusing lenses between autofocus and manual focusing lenses because you will most of the time be focusing manually, saving you considerable money.
I have included a star tracker as optional equipment you can invest in for superb results. Star trackers sit between the tripod and your digital camera and rotate the camera at the speed of the rotation of the Earth. These are very useful for astrophotography pursuits.
You will require a telephoto lens to capture widefield astrophotography and great images of deep-sky objects like the Andromeda galaxy, the Orion nebulae, and other objects. Lenses anywhere between 200mm to 500mm are ideally suitable for shooting these deep-space objects. Of course, you could opt for widefield telescopes. But those are beyond the scope of this discussion.
Astrophotography on a Budget: Complete Setup
Let’s build a budget setup for Astrophotography on a Budget and see how it looks –
Camera – Nikon D750.
Lens – Samyang 14mm f/2.8 ED AS IF UMC (Manual focusing)
Tripod – Magnus TR-13 portable travel tripod
Star tracker – iOptron SkyTracker Pro
You can perhaps build an even cheaper rig. We reiterate that you don’t have to go for the best cameras and lenses. You can use economical DSLR cameras like the Nikon D5100 or the Canon Rebel T7, along with an 18-55mm kit lens. These cameras have enough high resolution and the features necessary for shooting astrophotography in the right hands.
iOptron SkyTracker Pro
I recommended the iOptron SkyTracker Pro, one of the most cost-effective star trackers you could buy. It has a single-axis good equatorial mount for long exposures. Alternatively, if you want to invest more money, you can opt for the Sky-Watcher Star Adventurer Pro 21. This star tracker is one of the best in the market regarding standard units. It can easily work on long exposure images lasting up to 5 and even 6 minutes using long focal length lenses. The maximum payload of the iOptron SkyTracker Pro and the Sky-Watcher Star Adventurer Pro 21 is 5 kilos. That should comfortably support the weight of a full-frame camera and a wide-angle lens. The maximum focal length supported by the star trackers is 400mm, which ensures that you can use telephoto lenses and even go for widefield astrophotography later with the same setup.
Nikon vs Canon Camera options
If you fancy the Nikon setup, you can opt for the D750. Alternatively, for Canon, you can opt for the 6D, a great full-frame camera for good results. We have picked a full-frame camera because these cameras have a better low light performance than the crop sensor cameras. As the D750 is an old camera, you can get a second-hand model at a standard camera store. You don’t have to fork out an insane amount of money trying to go for a brand new full-frame DSLR or mirrorless. A full-frame camera has better low-light capabilities than a crop camera, and I strongly recommend it.
I recommended a wide-angle lens because, as an amateur astrophotographer, you will find buying expensive telephoto lenses difficult. Wide-angle lenses such as the ones recommended above are relatively less expensive. Wide-angle lenses let you capture a wider field of the scene, also known as landscape astrophotography.
Setting up your rig
The tripod is the first tool that needs to be set up. Make sure that the tripod you choose is good and does not wobble around when you mount weight on top of it. Setting up your tripod is the easiest of tasks. Next up is the star tracker. Depending on the exact make and model of the star tracker, you may have to spend some time setting it up, setting up the counterweight, and then mounting the star tracker onto your tripod. The next is the ball head. I haven’t mentioned a ball head in the list of things for deep-sky images, but this is something of a given, especially if you have a tripod. If you don’t have a ball head, you will be limited to the angle the star tracker gives you, which could be frustrating. With the ball head, you can swivel and change the camera’s orientation to ensure the optimum perspective for capturing the best images.
Finally, the camera with the lens attached goes on the top of the ball head. You can optionally attach a cable release or a remote trigger. This will ensure that the camera does not get touched and, therefore, accidentally moved during the exposure. You can alternatively use the timer function on your camera, which does the same thing.
Taking the shot
Once you have set up your rig, now is the time to start taking images. As an avid amateur astronomer and astrophotographer, here are a few simple techniques to keep in mind.
Setup on a new moon night
Always insist on setting up on a new moon night. This will ensure that the night sky has no light pollution from the moon. The window of opportunity is usually about three days before and after the new moon phase.
Pick a clear night
If the night sky is cloudy or there is a lot of pollution in the form of smog or smoke, this could impair your camera’s ability to pick up the details of distant stars and other deep space objects. Always insist that the night sky is devoid of clouds etc. High pollution levels in the atmosphere can also impair the camera’s ability.
Avoid light pollution
Light pollution is a real problem for all astrophotographers. You could make good night sky photography from your backyard, but to get better results to try and find a patch of sky that is not affected by light pollution. In other words, you must often drive yourself to remote locations for those high-quality images.
Plan your shots
Most of the time, amateur astronomers and budding astrophotographers fail to take good shots because they don’t plan what they will shoot. The right approach is to plan and know what the sky is going to look like, what constellations will be visible, and which stars and planets are in advance. To achieve this you need some simple mobile apps that you can use. This is not advanced science in any way. One of these apps is Stellarium. This app allows you to see what the night sky looks like on your smartphone even before you set it up. This is a great tool to scourge the location and discover what stars are visible in the night sky.
Another interesting app that you can use is Photopills. You can set up the shot by looking at where the Milky Way or a specific deep space object will appear in the night sky. You can even plan which constellation or deep-space object to capture in your shot, along with the background and foreground you are after.
You may enjoy reading Best Cameras Under $400
Camera Settings and Techniques

Once you have the necessary equipment, it’s time to understand the camera settings and techniques that will help you capture stunning astrophotography images. Here are some key considerations:
1. Manual Mode
Switch your camera to manual mode to have full control over settings like aperture, shutter speed, and ISO.
2. Aperture
Set your lens to its widest aperture (lowest f-stop value) to allow more light to enter the camera sensor.
3. Shutter Speed
Use long exposure times to capture the faint light from celestial objects. Start with shutter speeds around 20-30 seconds and experiment from there.
4. ISO
Increase the ISO to a higher value (e.g., ISO 1600 or higher) to amplify the camera’s sensitivity to light. Be cautious not to increase it too much to avoid excessive noise.
5. Manual Focus
Switch to manual focus and use the infinity focus mark or Live View to ensure sharp focus on the stars.
You may enjoy reading PNG vs JPG
Tips for Astrophotography on a Budget
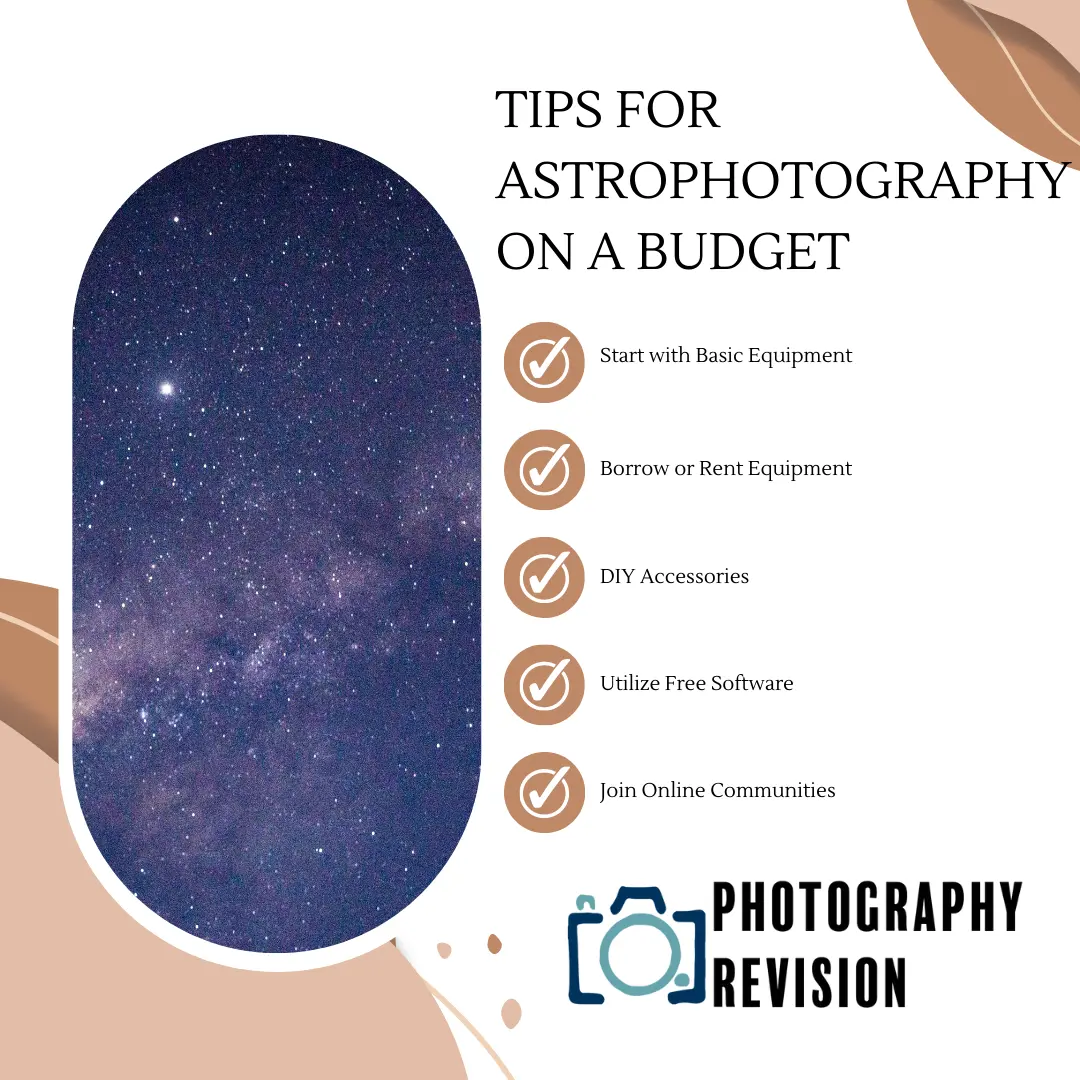
Astrophotography doesn’t have to break the bank. Here are some tips to help you pursue this fascinating hobby on a budget:
1. Start with Basic Equipment
Begin with a DSLR or mirrorless camera, a wide-angle lens, and a tripod. You can achieve remarkable results with these essentials.
2. Borrow or Rent Equipment
Consider borrowing or renting additional equipment like a telescope or specialty lenses to expand your astrophotography capabilities without a significant upfront investment.
3. DIY Accessories
Explore do-it-yourself (DIY) solutions for accessories such as camera adapters, light pollution filters, and dew heaters. Many affordable DIY options are available online.
4. Utilize Free Software
Instead of investing in expensive software, take advantage of free photo editing programs like GIMP and RawTherapee to enhance and process your astrophotography images.
5. Join Online Communities
Engage with online communities and forums dedicated to astrophotography. You can learn from experienced photographers, exchange ideas, and discover budget-friendly tips and tricks.
You may enjoy reading Best Cameras for Film Students
Post-processing and Editing
Post-processing plays a crucial role in astrophotography to enhance and bring out the details in your images. Here are some post-processing tips:
- Import your images into photo editing software.
- Adjust the levels, curves, and color balance to optimize the image.
- Use noise reduction techniques to reduce grain and noise.
- Enhance the details and sharpness of celestial objects.
- Experiment with creative editing techniques while keeping the image natural.
Showcasing Your Astrophotography
Now that you have captured some breathtaking astrophotography images, it’s time to showcase your talent. Here are some ways to share your work:
- Create an online portfolio or website to display your best images.
- Share your images on social media platforms like Instagram, Facebook, and Flickr.
- Participate in astrophotography contests and exhibitions.
- Contribute to astronomy magazines or online publications.
- Organize local exhibitions or collaborate with local art galleries.
Frequently Asked Questions
Do I need an expensive camera for astrophotography?
While high-end cameras offer advanced features, you can achieve impressive results with entry-level DSLR or mirrorless cameras that have manual controls.
Can I do astrophotography without a telescope?
Absolutely! Astrophotography can be done without a telescope using a wide-angle lens to capture the night sky, including stars, the Milky Way, and even some galaxies.
How long should the exposure be for astrophotography?
Exposure times can vary depending on the desired effect and the focal length of your lens. Start with 20-30 seconds and adjust accordingly.
Is post-processing necessary for astrophotography?
Post-processing allows you to enhance the details and correct any imperfections in your images. It is an important step in achieving stunning astrophotography results.
Can I use a smartphone for astrophotography?
While smartphones have improved their camera capabilities, they are limited in low-light performance and manual controls. Dedicated cameras offer more flexibility and control.
Final Thoughts on Astrophotography on a Budget
Astrophotography is a fascinating area of photography. A chance to spend time in remote locations and be at one with nature is very special. Whilst it can be an incredibly expensive hobby (just look at the equipment NASA use!) it doesn’t have to be. Investing in some well-priced equipment can get you into enjoying a good level of photography. And please share any photos of your adventures with us!
You may enjoy reading Top Floral photoshoot ideas
Comments are closed.